Who's Attacking Whom?
White pushes some kingside pawns, aims his pieces at the black
king, sacrifices a knight on g5 for an attack, infiltrates with
his queen and... resigns under a mating attack 10 moves later!
One of the oldest saying in chess states that if the initial attack
is not successful, the counterattack most likely will be. Very true
here. White opens the lines but Black's pieces turn out to be much
better placed to take advantage of them. The White queen has to
retreat in shame and Black's pieces are hard on her heels.
Filippov,V (2630) - Lautier,J (2677) [A34]
ECC Rethymnon GRE (6), 03.10.2003
1.Nf3 c5 2.c4 Nf6 3.Nc3 d5 4.cxd5 Nxd5 5.d4 Nxc3 6.bxc3 g6
7.e3 (D1)
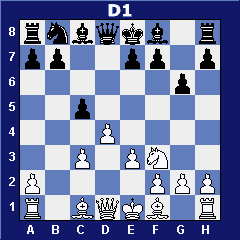 This
is an old position, going back to the 20's. White can play 7.e4
and play a main line Grunfeld Exchange by transposition. But English
Opening players usually prefer to play e3 at some point, keeping
a solid center. This
is an old position, going back to the 20's. White can play 7.e4
and play a main line Grunfeld Exchange by transposition. But English
Opening players usually prefer to play e3 at some point, keeping
a solid center.
It's interesting that White usually prefers to play e3 immediately
instead of first playing his bishop outside the pawn chain to f4
or g5 (although both of those moves are played).
The reason is simply that neither of those squares is particularly
attractive for White and the bishop can end up out of the action.
Playing the bishop out early allows Black to "play around"
it.
Another factor is that White reserves the option of playing e4
at some point later on, as happened in Portisch-Kasparov, Madrid
1988 as well as a recent Kramnik game. Grabbing the c-pawn after
7.Qa4+ has not worked out well. The open diagonal for the g7 bishop
is everything a Grunfeld player dreams of.
[7.dxc5? Qxd1+ 8.Kxd1 Bd7=/+; 7.Bg5 Bg7 8.Qd2 (8.e3 0-0 9.Qd2
cxd4 10.cxd4 b6 1/2-1/2 Kortschnoj,V-Reshevsky,S/Lone Pine 1979/MCL
(49)) 8...Qa5 9.e3 Nc6 10.Rc1 cxd4 11.cxd4 Qxd2+ 12.Nxd2
h6 13.Bh4 g5 14.Bg3 0-0 15.Bc4 0-1 Garcia Paolicchi,R-Karkanaque,I/Bled
2002/EXT 2003 (60)
7.Qa4+?! Nc6 8.dxc5 Bg7 9.Bb2 0-0 10.e3 Bd7 11.Qa3 Qc7 12.Be2 Rac8
13.Rd1 Be8 0-1 Kortschnoj,V-Furman,S/Moscow 1973/MCL (39)
7.Bf4 Bg7 8.e3 cxd4 (8...Qa5 9.Qd2 0-0 10.Be2 Nc6 11.Rb1 cxd4
12.cxd4 Qxd2+ 13.Kxd2 Rd8 14.Bb5 Bf5 15.Bxc6 Bxb1 16.Bxb7 Bxa2 17.Bxa8
Rxa8 18.Ra1 Bd5 19.Ra5 e6 20.Bd6 Bf6 21.Ne1 Bd8 22.Ra1 a5 23.f3
a4 1/2-1/2 Portisch,L-Timman,J/Tilburg 1980/MCD (23))
9.cxd4 Qa5+ 10.Qd2 Qxd2+ 11.Kxd2 0-0 12.Bd3 Nc6 13.Be4 Bd7 14.Rhc1
Rac8 15.Rab1 b6 16.Bd3 1-0 Kortschnoj,V-Hutchings,S/Nice 1974/EXT
2000 (40); 7.e4 Transposing into a Grunfeld Exchange.; 7.h4?! Bg7
8.h5 cxd4 9.cxd4 Nc6 10.e3 e5!= 11.h6 1/2-1/2 Olafsson,F-Ljubojevic,L/Buenos
Aires 1980/MCL/[Chekhov] (21) (11.hxg6 hxg6 12.Rxh8+ Bxh8 13.dxe5
Qxd1+ 14.Kxd1 Nxe5 15.Bb2 Bg4 16.Bb5+ Ke7 17.Ke2) ; 7.e4 Grunfeld
Exchange]
7...Bg7 8.Bd3 [8.Bb5+ Nc6 9.0-0 0-0 10.a4 Bd7 11.Ba3 cxd4
12.cxd4 a6 13.Bd3 Re8 14.Nd2 Be6 15.Rb1 Bd5 16.Bc5 f5 17.Bc4 Rb8
18.Bb6 Qd7 19.Bxd5+ Qxd5 20.Qb3 e6 21.Qxd5 exd5 22.g3 g5 23.Nf3
Bf6 24.Rfc1 Re7 25.Bc5 Rd7 26.Rb2 Na5 27.Nd2 1-0 Arsovic,G-Antic,D/Banja
Koviljaca YUG 2002/The Week in Chess 388 (27)]
8...0-0 9.0-0 Qc7 10.Qe2 Rd8
[10...b6 11.Rd1 Bb7 12.e4 e6 13.Be3 Nd7 14.e5 f6 15.exf6 Nxf6 16.Ne5
Nd5 17.Qg4 Bxe5 18.Qxe6+ Kh8 19.dxe5 Nxe3 20.fxe3 Rae8 21.Qd6 Qg7
22.e6 Qh6 23.e4 Qe3+ 24.Kh1 g5 25.Qe5+ 1-0 Gulko,B-Bengtson,M/Philadelphia
USA 2003/The Week in Chess 452 (25); 10...Nc6 11.Ba3 b6 12.Rab1
Rd8 13.Be4 Bb7 14.dxc5 Bxc3 15.Rfc1 Bf6 16.h4 Qd7 17.Ng5 Ne5 18.Rd1
Qc7 19.f4 Bxe4 20.Nxe4 Nd7 21.Nxf6+ 1/2-1/2 Kramnik,V-Van Wely,L/Monte
Carlo 1999/CBM 69 ext (21)]
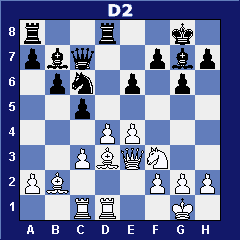
11.Rd1 b6 12.Bb2 Nc6 13.Rac1 Bb7 14.e4 It's hard for White
to make progress without playing this eventually. Now d4 is under
heavy pressure, but White's bet is that his kingside attack with
h4-h5 will be more effective. Black hopes to explode the white center
before his king becomes a factor.
14...e6 15.Qe3 (D2)
[15.h4 Rac8 16.h5 Qf4 17.hxg6 hxg6 18.Bb1 Na5 19.Re1 Qg4 20.Rcd1
cxd4 21.cxd4 Nc4 22.Bc1 b5 23.g3 Re8 24.Kg2 f5 25.Ng5 1/2-1/2 Kramnik,V-Topalov,V/Wijk
aan Zee 1998/CBM 63/[Khalifman] (25); 15.Qe3 Rac8 16.h4 h6 17.Be2
Qe7 18.h5 g5 19.Ba3 Bf8 20.dxc5 Qf6 21.e5 Qf4 22.Qxf4 gxf4 Portisch,L-Kasparov,G/Madrid
rapid 1988/EXT 88/1/2-1/2 (69)]
|


 15...Rd7
The first new move of the game, trying to improve on Kasparov's
15...Rac8 from a 1988 rapid game. Lautier immediately plays to increase
pressure on d4 by doubling rooks. White responds with the usual
plan of pushing his h-pawn.
15...Rd7
The first new move of the game, trying to improve on Kasparov's
15...Rac8 from a 1988 rapid game. Lautier immediately plays to increase
pressure on d4 by doubling rooks. White responds with the usual
plan of pushing his h-pawn. 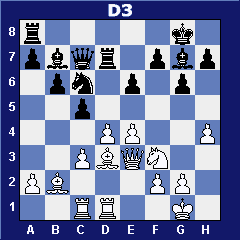 16...h6
A typical stratagem against a wing push. With pawns on g6 and
h6, Black can meet any advance by passing and locking the structure,
at least for a while. This weakens the squares around the black
king, but it's normal for him to live on the edge in these sharp
lines.
16...h6
A typical stratagem against a wing push. With pawns on g6 and
h6, Black can meet any advance by passing and locking the structure,
at least for a while. This weakens the squares around the black
king, but it's normal for him to live on the edge in these sharp
lines. 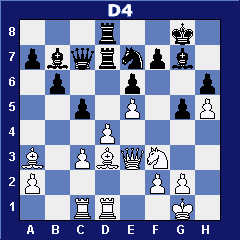 20.Nxg5?!
A radical way of punishing Black for his kingside pawn moves.
This sacrifice is quite unclear because Black's pieces are well
developed. The game now enters a tactical phase and Black does a
better job of navigating the dangers.
20.Nxg5?!
A radical way of punishing Black for his kingside pawn moves.
This sacrifice is quite unclear because Black's pieces are well
developed. The game now enters a tactical phase and Black does a
better job of navigating the dangers. 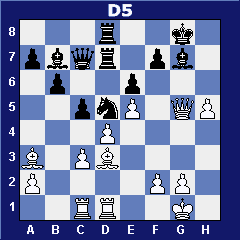 22...f5!
This is the key move. Black plays for counterattack, not just
defense. Now it's White who has to be cautious on the kingside!
The black heavy pieces are ready to combine with the b7 bishop to
counterattack the white king.
22...f5!
This is the key move. Black plays for counterattack, not just
defense. Now it's White who has to be cautious on the kingside!
The black heavy pieces are ready to combine with the b7 bishop to
counterattack the white king. 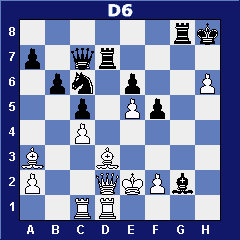 White's
king is open and all of Black's pieces participate in the attack.
It's hard to believe that it was White who recently sacrificed a
piece for a kingside attack!
White's
king is open and all of Black's pieces participate in the attack.
It's hard to believe that it was White who recently sacrificed a
piece for a kingside attack! 
 Kondratjev,
V – 1978
Kondratjev,
V – 1978
 Example
(W.Winter)
Example
(W.Winter)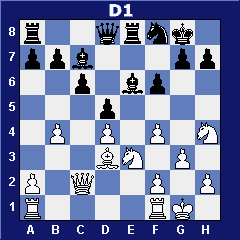 16...Bb6
Taking aim at the d4 pawn. This fantastic game between the former
and future world champions is a great example of our theme. Weak
pawns serve as distractions even when they can be successfully defended.
White has to use his forces to watch the d-pawn. This inhibits his
own attacking chances and also makes him vulnerable in other areas
because his pieces are tied down.
16...Bb6
Taking aim at the d4 pawn. This fantastic game between the former
and future world champions is a great example of our theme. Weak
pawns serve as distractions even when they can be successfully defended.
White has to use his forces to watch the d-pawn. This inhibits his
own attacking chances and also makes him vulnerable in other areas
because his pieces are tied down.  23...Bc7
The bishop's job on b6 is done. The weakness of d4 allowed Lasker
to create other weaknesses on the kingside and now he goes after
those.
23...Bc7
The bishop's job on b6 is done. The weakness of d4 allowed Lasker
to create other weaknesses on the kingside and now he goes after
those. 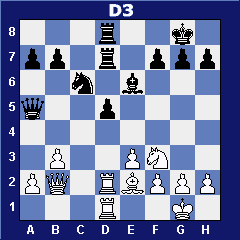 The
battle lines have been drawn. White has total control over the square
IN FRONT OF THE PAWN. This is a critical part of the strategy. Isolated
queen's pawns can be a pain in the neck if they can advance and
disrupt your position.
The
battle lines have been drawn. White has total control over the square
IN FRONT OF THE PAWN. This is a critical part of the strategy. Isolated
queen's pawns can be a pain in the neck if they can advance and
disrupt your position.  Fantastic!
Black is stuck defending d4 and White shifts to a kingside attack.
g5 will create open lines and more weaknesses in the black position.
True, White's king position is also weakened, but there is nothing
Black's pieces can do about it.
Fantastic!
Black is stuck defending d4 and White shifts to a kingside attack.
g5 will create open lines and more weaknesses in the black position.
True, White's king position is also weakened, but there is nothing
Black's pieces can do about it. 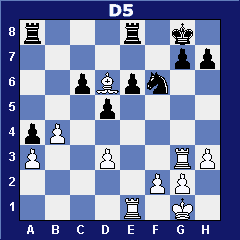 Although
it didn't come around in the usual way via a minority attack in
the queen's gambit, we have the typical backwards c6 pawn on a half-open
c-file. It's instructive how White slowly exploits this weakness,
and the one on a4, in the endgame.
Although
it didn't come around in the usual way via a minority attack in
the queen's gambit, we have the typical backwards c6 pawn on a half-open
c-file. It's instructive how White slowly exploits this weakness,
and the one on a4, in the endgame. 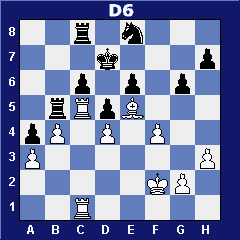 Illustrating
the other problem Black has. With his king defending c6, the white
king has a clear path to the kingside on the dark squares. He'll
just walk up and capture the h7 pawn.
Illustrating
the other problem Black has. With his king defending c6, the white
king has a clear path to the kingside on the dark squares. He'll
just walk up and capture the h7 pawn. 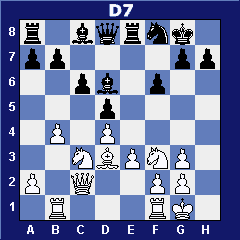 Beginning
the usual minority attack play. Two pawns attack three in order
to give Black a backwards c-pawn. This seems like a rather unambitious
plan and is certainly less spectacular than a sacrificial kingside
attack.
Beginning
the usual minority attack play. Two pawns attack three in order
to give Black a backwards c-pawn. This seems like a rather unambitious
plan and is certainly less spectacular than a sacrificial kingside
attack. 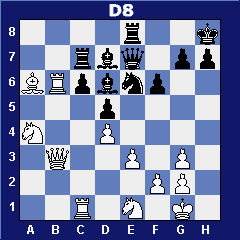 27...c5!
Eliminating the weakness and freeing his pieces. 28.Nxc5
Bxc5 29.dxc5 Nxc5 30.Qd1 [30.Qxd5? Nxa6 Winning a piece.]
27...c5!
Eliminating the weakness and freeing his pieces. 28.Nxc5
Bxc5 29.dxc5 Nxc5 30.Qd1 [30.Qxd5? Nxa6 Winning a piece.] 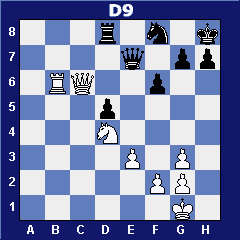 A
dream position compared to what would have occurred after 30...d4!
The black pawn is blockaded by the best possible blockader, a knight.
A
dream position compared to what would have occurred after 30...d4!
The black pawn is blockaded by the best possible blockader, a knight.